Checking your engine oil takes less than 3 minutes and can prevent thousands of dollars in engine damage. Yet most drivers either never do it, or do it wrong — getting a false reading and either overfilling or missing a dangerously low level. This guide gives you the correct 7-step process, the exact dipstick reading method that eliminates errors, a complete oil color diagnostic chart, and everything you need to know about cars that have no dipstick at all.
How to Check Engine Oil Level — Complete 7-Step Process
Step 1: Park on Level Ground and Wait
Park your car on a completely flat surface. Even a slight slope causes oil to pool on one side of the oil pan, giving you a false dipstick reading — you might think your oil is fine when it is actually half a quart low. Engage the parking brake.
If you have been driving, turn the engine off and wait 5–10 minutes. Hot oil expands and circulates into the upper engine — the dipstick reading while hot will show a higher level than the actual cold level. Waiting allows all the oil to drain back into the oil pan and gives you an accurate measurement.
Exception: Some manufacturers (BMW, Porsche, certain Mercedes models) specifically recommend checking oil when the engine is warm. Always check your owner’s manual for your specific vehicle’s requirement. When in doubt — check cold.
Step 2: Open the Hood and Find the Dipstick
Pull the hood release lever (usually located under the dashboard on the driver’s side). Go to the front of the car, find the secondary hood latch, and lift the hood fully. Prop it open if your car requires it — most modern cars have a hood that stays up on its own gas strut.
The oil dipstick handle is almost always a bright color — typically yellow, orange, or red — to make it easy to find in a busy engine bay. It is usually a circular loop or T-shaped handle. On most cars it is located near the front of the engine, slightly to the driver’s side. It may be labeled with an oil can icon or the word “OIL.”
| Car Brand | Typical Dipstick Location | Handle Color |
|---|---|---|
| Toyota / Lexus | Front center of engine, slightly left | Yellow |
| Honda / Acura | Front right side of engine | Yellow or Orange |
| Ford (F-150, Mustang, Focus) | Driver’s side, near valve cover | Yellow |
| Chevrolet / GMC | Driver’s side, front of engine | Yellow |
| Dodge / Chrysler | Driver’s side, mid-engine area | Yellow |
| BMW | Electronic only — no dipstick on most models from 2008+ | N/A |
| Mercedes-Benz | Electronic only — no dipstick on most E/C/S Class | N/A |
| Volkswagen / Audi | Front center, bright yellow handle | Yellow |
Step 3: Pull Out the Dipstick — First Pull Is Just for Cleaning
Pull the dipstick straight out of its tube. Do not angle it — pull straight up and out. You will see oil on the lower portion of the stick. This reading is not accurate — oil has splashed and wicked up the stick during engine operation. This first pull is only to wipe the stick clean.
Wipe the entire dipstick — from the handle end to the very tip — with a clean lint-free rag or paper towel. Get all the oil off completely. Look at the oil on your rag — this is your first clue about oil condition (more on this in the color diagnostic section below).
Step 4: Reinsert the Dipstick Fully and Pull Out Again
Push the clean dipstick back into its tube all the way — it must be fully seated at the bottom of the tube. You should feel it click or stop against the bottom. If it is not fully inserted, you will get a false reading.
Wait 3–5 seconds. Then pull the dipstick straight out again in one smooth motion. Hold it horizontally — do not tilt it up or down — and immediately look at the oil level marking before oil can run down the stick and give you a misleading reading.
Step 5: Read the Oil Level Correctly
Every dipstick has indicators near the bottom that show the minimum and maximum oil levels. These markings vary by manufacturer:
| Marking Style | Minimum Indicator | Maximum Indicator | Safe Zone |
|---|---|---|---|
| Letters | L (Low) or MIN | H (High) or MAX | Between L and H |
| Lines or dots | Lower line or dot | Upper line or dot | Between the two marks |
| Crosshatch area | Bottom of hatched zone | Top of hatched zone | Oil touching anywhere in the hatched area |
| Single hole | Below the hole | Above the hole | Oil at or near the hole level |
What the reading means:
- At or near MAX / H: Perfect — do not add oil
- Midway between MIN and MAX: Fine — no action needed
- Near MIN / L: Low — add half a quart and recheck
- Below MIN / L: Critically low — add oil immediately before driving further
- Above MAX: Overfilled — this is a problem. Do not drive until excess is drained
Important: The difference between MIN and MAX on most dipsticks represents approximately 1 quart of oil. If your reading is at MIN, you need roughly 1 quart to reach MAX. Add oil in small amounts — half a quart at a time — checking the dipstick between additions. Overfilling is genuinely damaging to the engine.
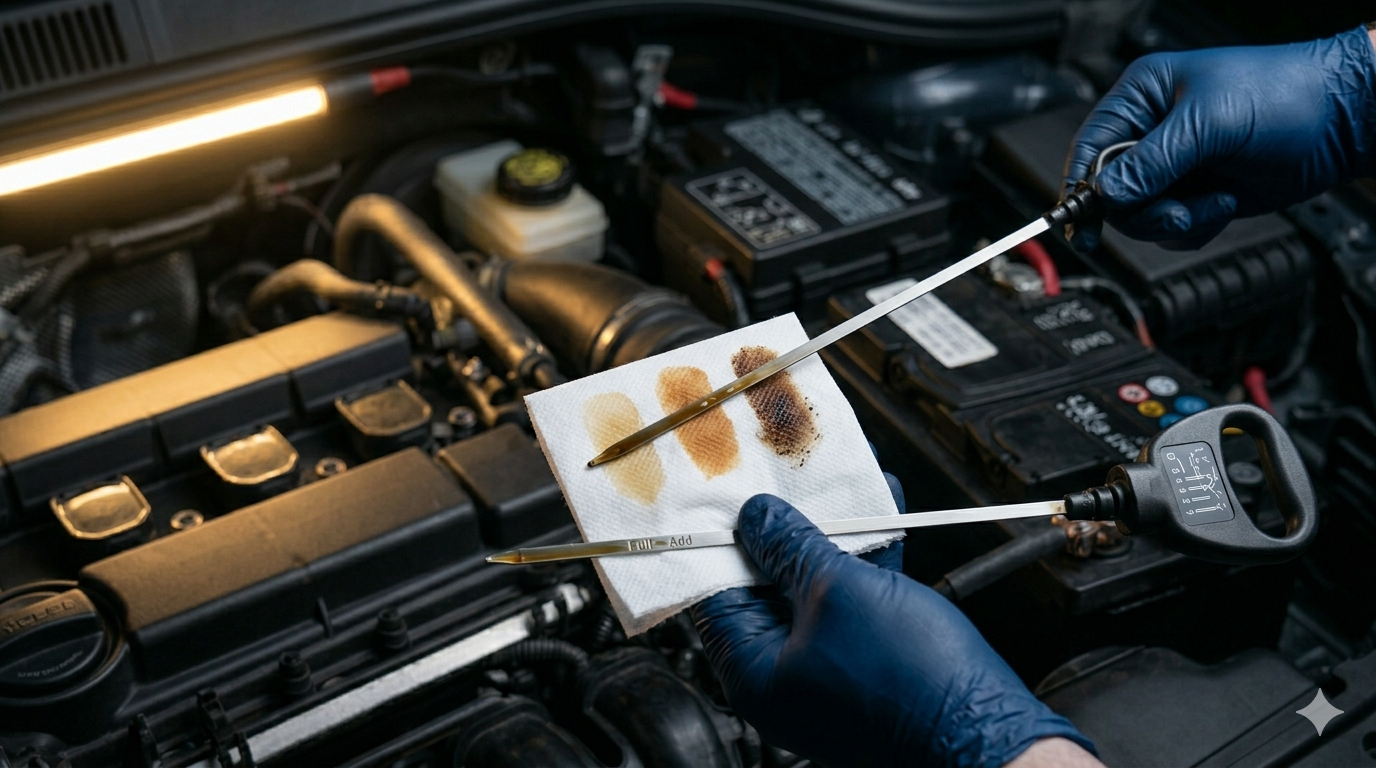
Step 6: Check the Oil Color and Condition
The oil level tells you how much oil you have. The oil color tells you the condition of that oil and whether the engine has any hidden problems. This is the most valuable diagnostic step that most guides skip entirely:
| What You See on the Dipstick | What It Means | Action to Take |
|---|---|---|
| Amber or golden yellow, translucent | Fresh oil — recently changed and clean | None — this is perfect |
| Light brown, slightly darker than new | Normal aged oil — working properly | None if level is good |
| Dark brown, still fluid and clear | Oil is aged but still acceptable | Plan an oil change soon |
| Black, opaque — no light passes through | Oil is overdue for a change | Change oil immediately |
| Black AND gritty or grainy texture | Metal particles or carbon contamination | Oil change + have engine inspected |
| Milky white or creamy appearance | Coolant is mixing with oil — head gasket leak | Stop driving — serious engine issue |
| Foamy or frothy bubbles in the oil | Water contamination or severe overfill | Do not drive — professional diagnosis needed |
| Very thin and watery consistency | Oil diluted with fuel — injector or ring problem | Professional diagnosis needed |
| Normal color but a strong burnt smell | Oil is thermally degraded — overheating history | Change oil — investigate why it ran hot |
The milky appearance is the most critical finding. Milky or creamy oil means coolant has entered the engine — almost always through a failed head gasket or cracked engine block. Do not drive the car. The coolant-oil mixture provides almost no lubrication and the engine will suffer severe damage within minutes of operation. Call a mechanic before starting the engine again.
Step 7: Add Oil if Needed — Correctly
If your oil level is at or below the minimum mark, add oil. Here is the correct process:
- Locate the oil filler cap on top of the engine — usually labeled with an oil can symbol or the word “OIL.” On most cars it is a round cap on the valve cover. Turn it counter-clockwise to remove.
- Use a clean funnel to avoid spills inside the engine bay. Oil on hot surfaces causes burning and smoke.
- Add half a quart at a time. Do not pour in a full quart at once — it is easy to overfill.
- Wait 60 seconds for the oil to drain into the pan, then recheck the dipstick using the full 7-step process.
- Repeat until the dipstick reads between the MIN and MAX marks — ideally close to but not at MAX.
- Replace the oil filler cap and turn it clockwise until it seats firmly. A loose cap allows oil to spray around the engine bay during operation.
Which oil to add: Always use the same viscosity grade and specification your engine requires (check your owner’s manual or the existing oil cap label). Adding the wrong viscosity — especially a thicker grade — can cause VVT solenoid issues and is harder on the engine than a brief top-off with the correct grade. In an emergency, using a slightly different brand but same viscosity is fine — brands are compatible. See our full guide on whether you can mix engine oil brands.
Hot vs Cold Check — The Debate Resolved
You will find conflicting advice online about whether to check oil hot or cold. Here is the definitive answer:
| Method | Accuracy | Best For | Exception |
|---|---|---|---|
| Cold engine (not driven in 8+ hours) | Most accurate level reading | Morning checks, general maintenance | Some European brands require warm check |
| Warm engine (5–10 min after shutdown) | Accurate with patience | After a drive when you remember to check | Do not check immediately after driving |
| Immediately after shutdown (hot) | Inaccurate — reads high | Never ideal | Avoid if possible |
| Engine running | Very inaccurate + burn risk | Never | None — do not check while running |
For most drivers in most cars — check cold, first thing in the morning. The reading is consistently accurate, the oil has fully settled overnight, and there is no burn risk. The only exception: BMW, Porsche, and certain Mercedes-Benz vehicles have their dipstick calibrated for warm oil. Their owner’s manuals will specify this. For these vehicles, warm the engine to operating temperature, shut it off, wait 5 minutes exactly, then check.
Cars Without a Dipstick — How to Check Oil Level
An increasing number of modern vehicles — primarily European brands — have eliminated the traditional oil dipstick in favor of an electronic oil level sensor. If you cannot find a dipstick in your engine bay, your car likely uses a digital oil monitoring system.
Vehicles without dipsticks include: BMW (most models from 2008 onward), Mercedes-Benz E-Class, C-Class, and S-Class, Audi (some models), Porsche Cayenne and Panamera, and some newer Chevrolet and Cadillac models.
How to check oil level on a car without a dipstick:
- Turn the ignition to the “on” position without starting the engine (press Start/Stop once without pressing the brake on push-button start cars)
- Navigate to the vehicle information menu on your instrument cluster or iDrive/MMI/COMAND screen
- Find “Oil Level,” “Vehicle Status,” or “Service” menu
- The display shows the oil level as a percentage, bar graph, or MIN/MAX indicator
- On BMW specifically: Oil Level is found under Vehicle Information in the iDrive menu
- Wait the specified time after engine shutdown (usually 5 minutes for the oil to settle before the sensor gives an accurate reading)
Limitation of electronic sensors: They measure oil level at one point in the oil pan and can be fooled by a slightly unlevel parking surface. If your electronic reading seems questionable, park on perfectly level ground and wait the full 5 minutes. Also, electronic sensors do not assess oil quality — only level. You will not get a “milky oil” warning from an electronic system. Have the oil visually inspected during every service.
How Often Should You Check Your Engine Oil?
| Your Situation | Check Frequency | Why |
|---|---|---|
| New car under 30,000 miles, no known issues | Once a month | Healthy engines lose very little oil |
| Car with 75,000–100,000 miles | Every 2 weeks | Aging seals may allow minor consumption |
| Car over 100,000 miles | Weekly | Consumption increases with engine wear |
| Known oil consumer (burning or leaking) | Before every long trip | Consumption rate is unpredictable |
| Before any road trip over 200 miles | Always check before departure | Running low on the highway is dangerous |
| After seeing the oil pressure warning light | Immediately — pull over first | Low pressure means potential engine damage already |
Common Oil Check Mistakes and How to Avoid Them
- Not reinserting the dipstick fully: The most common error — a partially inserted dipstick gives a falsely high reading. Always push it all the way in until it bottoms out.
- Reading the dipstick on an angle: Hold it horizontally. Tilting it causes oil to run toward one end and distort the level reading.
- Checking immediately after driving: Hot oil reads higher than actual. Wait at least 5–10 minutes after shutdown for accuracy.
- Confusing the transmission fluid dipstick with the oil dipstick: Many cars have both. The transmission dipstick is usually on the passenger side of the engine, farther back. Never add engine oil to the transmission.
- Ignoring the oil color: A reading between MIN and MAX is only half the information. Always note the color — especially watch for milky or foamy oil that indicates a serious engine problem regardless of level.
- Adding too much oil at once: Overfilling by even half a quart above MAX causes the rotating crankshaft to aerate the oil, reducing lubrication quality and potentially damaging seals. Add in half-quart increments.
Frequently Asked Questions
How do you check engine oil level?
Park on level ground and wait 5–10 minutes after turning off the engine. Open the hood, find the brightly colored dipstick handle, and pull it out. Wipe it clean with a rag, reinsert it fully, wait 5 seconds, then pull it out again. Read the oil level where the oil film ends relative to the MIN and MAX markers. Also note the color — amber is fresh, dark brown is normal, milky or foamy oil indicates a serious engine problem requiring immediate professional diagnosis.
Should I check engine oil hot or cold?
For most cars, check oil cold — first thing in the morning before starting the engine gives the most accurate reading. If you have already driven, wait 5–10 minutes after shutdown before checking. Never check with the engine running. The exception: BMW, Porsche, and some Mercedes-Benz vehicles are calibrated for a warm oil check — their owner’s manuals specify this. When in doubt, check your owner’s manual for your specific vehicle.
What does it mean if engine oil is black?
Black engine oil means the oil has absorbed combustion byproducts and carbon deposits over its service life — it is doing its job but it is overdue for a change. Black oil by itself is not a crisis, but it should be changed at the next available opportunity. If the oil is also gritty or has visible particles, have the engine professionally inspected alongside the oil change to rule out abnormal internal wear.
What does milky engine oil mean?
Milky, creamy, or frothy engine oil means coolant has mixed with the engine oil — almost always through a blown head gasket or a cracked engine block. This is a serious engine emergency. Do not start or drive the car. The coolant-oil mixture provides almost no lubrication and the engine will be severely damaged within minutes of operation. Call a mechanic immediately — this requires professional diagnosis and repair before the vehicle is driven again.
How often should I check my engine oil level?
Check your engine oil at least once a month for newer cars in good condition. For high-mileage vehicles over 75,000 miles, check every two weeks. For cars over 100,000 miles or known oil consumers, check weekly. Always check before any road trip over 200 miles. Catching oil that is half a quart low costs nothing to fix — catching the same problem after the engine has been running starved of oil can cost thousands.
My car has no dipstick — how do I check the oil?
Many modern European vehicles — particularly BMW, Mercedes-Benz, Audi, and Porsche — use an electronic oil level sensor instead of a dipstick. Turn the ignition to the on position without starting the engine, navigate to the Vehicle Information or Service menu on the instrument cluster, and find the Oil Level reading. On BMW, this is in the iDrive menu under Vehicle Information. Wait at least 5 minutes after the last drive for an accurate reading from the sensor.
Related Guides
Now that you know how to check your oil, knowing when to change it is equally important. Our guide on the 10 signs your car needs an oil change covers every warning symptom to watch for. For exact change intervals, see our complete breakdown of how often to change synthetic oil. And if you are checking oil in a high-mileage car and noticing consumption, our guide on best oil for high mileage cars tells you exactly which formula addresses your engine’s specific needs.