To add coolant to your car: verify the engine is cold (minimum 30 minutes after shutdown), locate the translucent reservoir near the radiator, check current level against the MIN/MAX lines, identify your coolant type from the owner’s manual or cap label, add the correct pre-mixed coolant slowly until reaching MAX, replace the cap firmly, start the engine and watch the temperature gauge stay in the normal range. Never open the radiator cap on a hot engine — the system pressurizes to 15–18 PSI and boiling coolant will spray out instantly.
Here’s something nobody tells you when they say “just top off the coolant.” The wrong coolant — meaning the wrong chemistry type, not just a different brand — silently destroys the metal alloys inside your cooling system over months. The damage is invisible until you get a $1,200 water pump replacement or a $2,800 radiator job. And the frustrating part? The bottles look almost identical on the shelf. This guide gives you everything to get it right the first time: which type your specific car actually needs, the exact 9-step process, a complete coolant color guide, and the five mistakes that mechanics see constantly.
Before You Open Anything: The Non-Negotiable Safety Check
This is not a formality. It’s the reason people end up in the emergency room with burns across their face and arms.
A modern cooling system operates at 15–18 PSI of pressure at operating temperature. At that pressure, coolant boils at approximately 265°F — far above its atmospheric boiling point. When you open a pressurized cap on a hot engine, that pressure releases instantly. The coolant flashes to steam and erupts from the opening. It does not drip. It sprays.
The rule is absolute: engine must be cold before you open anything. Not warm. Cold. “Cold” means parked for at least 30 minutes after the last drive — ideally first thing in the morning before the first start. If you can comfortably hold your palm on the engine block or the radiator hose for 10 seconds without discomfort, you are in safe territory. If you cannot — wait longer.
One caveat for emergency situations: if you are broken down and must add coolant to a hot system, use the following method only. Cover the cap completely with a thick, folded rag. Turn it very slowly counterclockwise — just a quarter turn. Stop. Wait until all hissing completely stops. Then continue turning slowly. Never remove the cap in a single motion on a hot engine under any circumstances.
What Type of Coolant Does Your Car Actually Need?
This is where most guides fail you. They say “check your owner’s manual” without explaining what you’re looking for or why it matters. Here’s the complete picture.
Coolant chemistry comes in three main technology types. Each uses different corrosion inhibitors. Those inhibitors are designed to protect specific metal alloys used in specific engines. Mix the wrong chemistry and the inhibitors react with each other, form deposits, and stop protecting the metals they were designed for. Your aluminum radiator, your water pump impeller, your heater core — all start corroding faster than they should.
The 3 Coolant Chemistry Types — Explained Simply
| Type | Full Name | Color (Typically) | Service Life | Common In |
|---|---|---|---|---|
| IAT | Inorganic Additive Technology | Green | 2 years / 30,000 miles | Pre-2000 vehicles, older GM, Ford, Chrysler |
| OAT | Organic Acid Technology | Orange, Red, Pink, Blue | 5 years / 150,000 miles | GM Dex-Cool vehicles, most modern imports |
| HOAT | Hybrid Organic Acid Technology | Yellow, Gold, Turquoise, Purple | 5 years / 150,000 miles | European vehicles, newer Ford, Chrysler, Toyota |
Notice that color is not a reliable identifier of chemistry type. Orange can be OAT or HOAT depending on the brand. Green can be IAT or a “universal” HOAT. This is why you cannot shop by color — you must know the chemistry type specification your vehicle requires.
Coolant by Make — What Your Car Actually Requires
| Vehicle Make | Required Type | Color (OEM) | Common Brand |
|---|---|---|---|
| Toyota / Lexus | HOAT (Toyota Super Long Life) | Pink / Red | Toyota Genuine Coolant |
| Honda / Acura | OAT (Honda Type 2) | Blue / Green | Honda Blue Coolant |
| Ford (2002+) | HOAT (Ford Gold) | Gold / Yellow | Motorcraft Gold |
| Ford (pre-2002) | IAT | Green | Motorcraft Green |
| Chevrolet / GMC (Dex-Cool) | OAT | Orange | AC Delco Dex-Cool |
| Dodge / Chrysler / RAM | HOAT (MOPAR) | Pink / Orange | MOPAR Antifreeze |
| BMW | HOAT (BMW Blue) | Blue | BMW Genuine Coolant |
| Mercedes-Benz | HOAT (MB 325.0) | Blue / Purple | Mercedes Genuine Coolant |
| Volkswagen / Audi | HOAT (G12/G13) | Pink / Violet | VW G12++ or G13 |
| Hyundai / Kia | OAT or HOAT | Blue / Green | Check specific model year |
| Subaru | HOAT | Blue | Subaru Super Coolant |
| Nissan / Infiniti | HOAT | Blue / Green | Nissan Blue Long Life |
The only reliable way to confirm: open your owner’s manual to the fluids section and look for the coolant specification. It will list a specific chemistry designation — OAT, HOAT, G12, G13, Dex-Cool, Toyota Super Long Life, etc. Match that designation when buying coolant, not the color.
Concentrate vs Pre-Mixed — Which to Buy
Pre-mixed is sold as 50/50 antifreeze and distilled water — ready to pour straight into the reservoir. Concentrate requires you to dilute it with distilled water before adding. Not tap water. Distilled water. Tap water contains minerals — calcium, magnesium, chlorides — that react with coolant additives and accelerate corrosion and scale buildup inside the cooling system.
The correct dilution ratio for most climates is 50% antifreeze concentrate to 50% distilled water. This gives freeze protection to approximately -34°F and boil-over protection to approximately 265°F. In extreme cold climates, up to 70% antifreeze to 30% water is acceptable — but do not go beyond 70% antifreeze. More antifreeze does not mean more protection. Above 70%, the freeze and boil-over protection actually decreases and the heat transfer efficiency drops significantly.
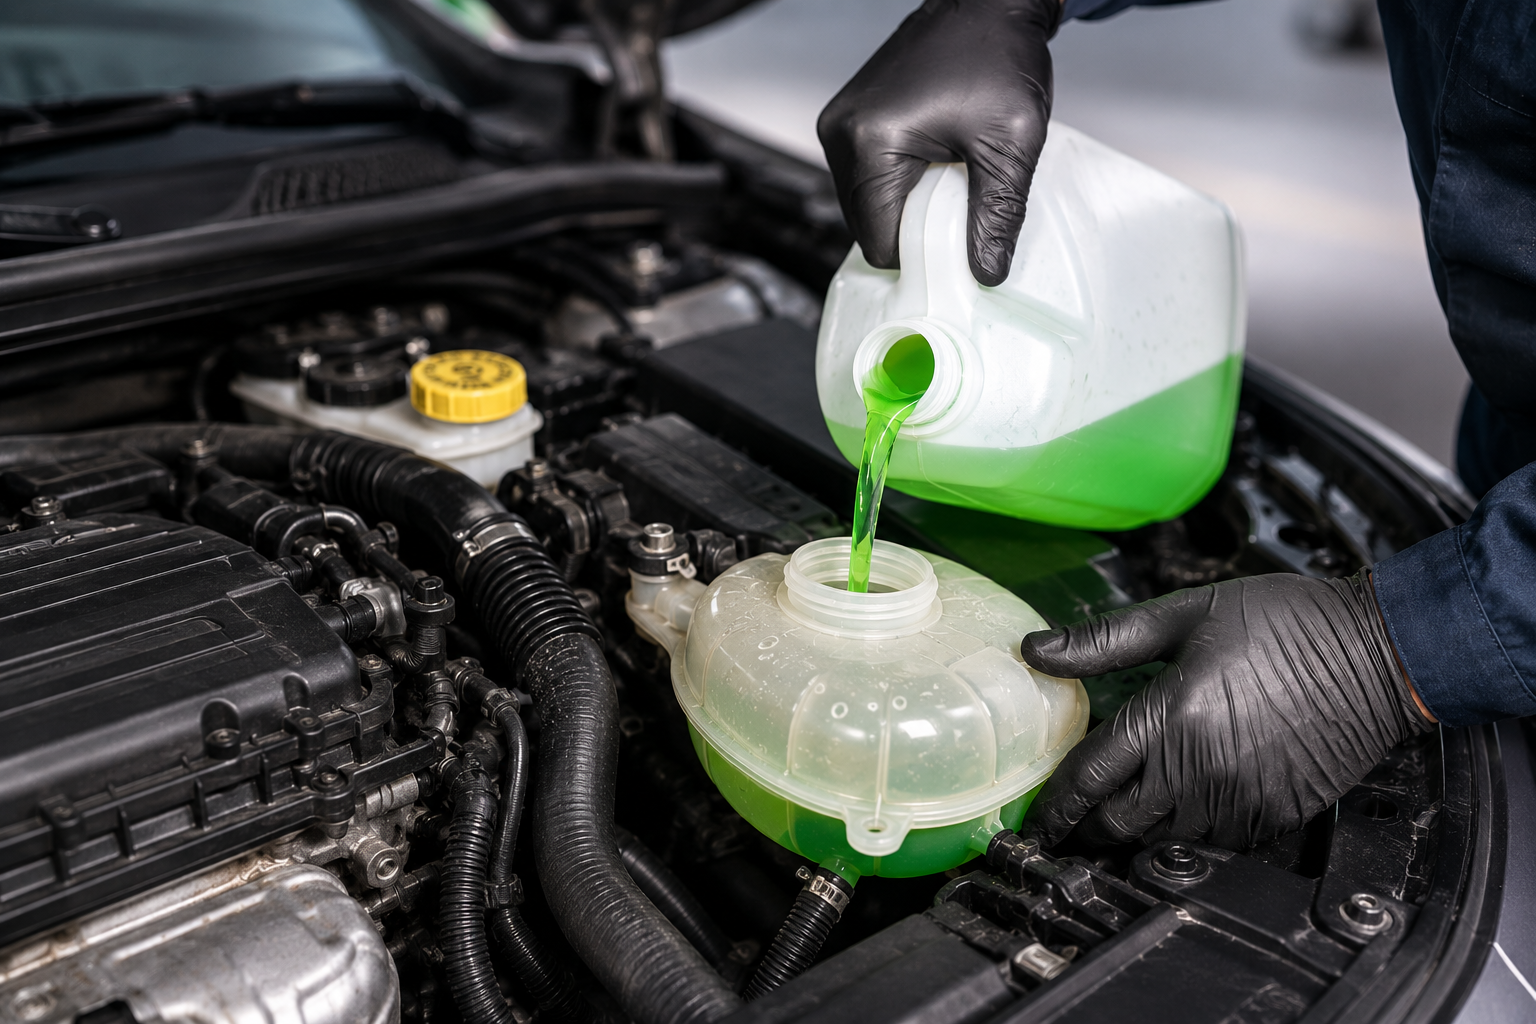
How to Add Coolant to Your Car: Complete 9-Step Process
Step 1: Park on Level Ground and Let the Engine Cool Completely
Level ground matters because you’re checking fluid levels — a slope tilts the coolant away from the reservoir sensors and markings. Even a 3-degree slope can make a properly filled reservoir appear 15% low. Engage the parking brake and leave the car on a flat surface. The engine must be cold — 30 minutes minimum after shutdown, first thing in the morning is ideal.
Step 2: Gather Everything Before Opening the Hood
You need: the correct coolant type for your vehicle (confirmed from owner’s manual), a funnel, clean rags or paper towels, and optionally — nitrile gloves. Coolant contains ethylene glycol, which is toxic to pets and has a sweet smell that attracts animals. Any spills must be cleaned up completely. Keep children and pets away from the work area before you start.
Step 3: Open the Hood and Locate the Coolant Reservoir
The coolant reservoir is a translucent or semi-opaque plastic tank — you can see the fluid level through the sides without opening it. It connects to the radiator via a small hose and usually sits near the front of the engine bay, adjacent to or near the radiator. It has a cap marked with a coolant/radiator symbol (a thermometer in a wave, or the words COOLANT, ANTIFREEZE, or ENGINE COOLANT). It may also have a warning label: DO NOT OPEN WHEN HOT.
Do not confuse it with the windshield washer reservoir — that is typically blue-capped and larger. Do not confuse it with the brake fluid reservoir — that is a small, translucent container near the firewall. Do not open anything except the coolant reservoir cap.
Step 4: Check the Current Coolant Level Against the Markings
Without opening the cap, look at the outside of the reservoir. The markings show MIN (minimum) and MAX (or FULL) levels. The coolant should sit between these marks — ideally closer to MAX when the engine is cold. Below MIN means you need to add coolant. At or above MAX means you are full and no addition is needed. Above MAX means the system is overfilled — excess coolant will be expelled through the overflow tube during the next drive cycle.
Step 5: Note the Coolant Color and Condition
Before adding anything, look at the color and clarity of the existing coolant through the reservoir wall. This inspection takes 10 seconds and tells you the condition of what’s already in the system.
| What You See | What It Means | Action |
|---|---|---|
| Clear, bright original color (green, orange, pink, blue) | Coolant is fresh and in good condition | Top up with the same type |
| Dark, cloudy, murky original color | Coolant is aged and degraded — additives depleted | Top up now, schedule full flush |
| Brown, rust-colored, muddy | Corrosion in the system — coolant has failed | Do not top up — schedule full flush and inspection |
| Milky white, foamy, or frothy | Engine oil mixing with coolant — head gasket or cracked block | Do not drive. Professional diagnosis immediately |
| Normal color but with floating particles or grit | Scale or deposit buildup — system degraded | Schedule full cooling system flush |
Milky coolant is a serious emergency. Oil and coolant mixing means a failed head gasket or a cracked engine component. Adding coolant to this system and driving on it causes rapid engine destruction. If the coolant looks milky, park the car and call a mechanic before starting the engine again.
Step 6: Open the Reservoir Cap Correctly
With a rag in hand — just in case of residual pressure — slowly turn the reservoir cap counterclockwise. Modern coolant reservoir caps are designed for cold-engine access and are safe to open when the engine is cold. You may hear a very slight equalization of pressure — a faint hiss that stops within one second. This is normal. If the hissing does not stop quickly, the engine is not fully cold yet. Replace the cap and wait longer.
Note: Some vehicles require opening the radiator cap directly rather than a separate reservoir. On these vehicles (common on older cars and some European models), the radiator cap is on top of the radiator and is the single point for adding coolant. Your owner’s manual confirms which system your vehicle has. The same cold-engine rule applies absolutely.
Step 7: Add the Coolant Slowly Using a Funnel
Place the funnel in the reservoir opening. Pour the coolant slowly and steadily — do not pour quickly, as air pockets can form and create false level readings. Add coolant in 200–300ml increments (roughly a cup at a time), pausing between additions to let the fluid settle and the level stabilize. Watch the level through the reservoir wall as you pour.
Stop adding when the level reaches the MAX line — not above it. Overfilling pushes excess coolant out through the overflow hose during the next drive cycle when the coolant heats up and expands. You will find a puddle under the car and think you have a leak. You do not — you overfilled. Stop at MAX.
If any coolant spills on the engine, the body, or the ground — wipe it up immediately. Ethylene glycol is slippery on engine components and toxic to animals. Do not leave puddles or wet surfaces.
Step 8: Replace the Cap Firmly and Completely
Turn the cap clockwise until it seats firmly — you will feel it stop and on many caps, click into position. A loose reservoir cap allows coolant to evaporate faster and in some systems (particularly older vehicles) allows pressure to escape, lowering the boiling point of the coolant and making the system less effective. Tighten until secure — not so tight that you cannot remove it at the next service, but firmly seated.
Step 9: Start the Engine and Verify
Start the car and let it run until it reaches operating temperature — this typically takes 5–10 minutes. Watch the temperature gauge on the dashboard throughout. It should rise from cold, stabilize in the middle of the gauge range (the normal operating zone), and stay there. If the gauge continues rising toward the red zone after the engine is warm — stop the engine immediately. An airlock may have formed in the cooling system when coolant was added, or there is an underlying cooling system problem.
After the engine has reached temperature, turn it off and let it cool for 15 minutes. Then recheck the reservoir level. It may have dropped slightly as coolant circulated through the system and displaced any air. If it dropped below MIN, add a small additional amount to bring it back to MAX. This final check is a step most drivers skip — and then wonder why their coolant level is low again a week later.
Can You Mix Different Coolant Types? The Honest Answer
You can mix coolant types without the engine immediately failing. That is the honest answer. But “won’t immediately fail” is different from “safe to do.”
Here is what actually happens when you mix OAT with IAT, or HOAT with OAT: the organic acid inhibitors and the inorganic silicate inhibitors interact. They do not violently react — but the silicates can form a gel-like precipitate that reduces heat transfer efficiency and partially blocks small passages in the heater core and radiator. The inhibitor concentrations drop, reducing the coolant’s ability to protect metal surfaces from corrosion. The service life of the mixed coolant is significantly shorter than either type alone.
| Mix Scenario | Short-Term Safety | Long-Term Consequence | Action |
|---|---|---|---|
| OAT + OAT (different brands, same chemistry) | ✅ Safe | None significant | Acceptable top-up |
| HOAT + HOAT (different brands, same chemistry) | ✅ Safe | None significant | Acceptable top-up |
| OAT + IAT | ⚠️ Short term only | Inhibitor conflict, reduced service life | Emergency top-up only, flush within 6 months |
| HOAT + IAT | ⚠️ Short term only | Possible silicate precipitation | Emergency top-up only, flush soon |
| OAT + HOAT | ⚠️ Marginal | Diluted inhibitor effectiveness | Top-up acceptable, flush at next service |
| Any coolant + tap water | ⚠️ Short term | Mineral deposits accelerate corrosion | Use distilled water only for dilution |
| Any coolant + plain water only (no antifreeze) | ⚠️ Emergency only | No freeze protection, accelerated corrosion | Replace with proper mixture ASAP |
If you have already mixed incompatible types — or are unsure what type is currently in the system — the correct action is a complete cooling system flush at the next service opportunity. A flush drains the old mixture completely, flushes the passages with clean water, and refills with the correct single-type coolant. At a shop, a flush costs $100–$150. It is significantly cheaper than the water pump, radiator, or heater core damage that prolonged use of a degraded or mixed coolant causes.
5 Common Mistakes That Send People Straight to the Mechanic
Mistake 1: Opening the Cap on a Hot Engine
Already covered — but worth emphasizing again because it is the most dangerous mistake on this list. Hospital burn ward visits from opening radiator caps on hot engines are a real and preventable occurrence. There is no scenario where you need to open the cooling system of a hot engine. Wait. Always wait.
Mistake 2: Using the Wrong Coolant Type
The “universal” coolants on auto parts store shelves sound like the perfect solution. In practice, they work acceptably for most applications but are not optimized for the specific metals in your engine. If your car specifies VW G13, Toyota Super Long Life, or BMW Blue — use those specific formulations. The cost difference between the correct OEM-spec coolant and a generic universal product is typically $5–$15. The cost difference between a healthy cooling system and a corroded one is several thousand dollars.
Mistake 3: Topping Off Without Checking Why It Was Low
Coolant levels drop for one of two reasons: normal evaporation of water from the coolant mixture over time (very gradual — perhaps an inch below MAX over a year of normal driving), or a leak. If your coolant level dropped significantly in a short period — weeks rather than months — you have a leak. Adding coolant to a leaking system gets you down the road today but does not fix the leak. The next time you check, the level will be low again. Worse, if the leak is into the engine (failed head gasket), you are adding coolant that will mix with oil and cause engine damage. Always investigate why the level dropped before simply topping up.
Mistake 4: Overfilling the Reservoir
Coolant expands significantly when hot — typically 10–15% in volume between cold and operating temperature. The space between the MAX cold fill line and the top of the reservoir exists specifically to accommodate this expansion. Filling above the MAX cold line means the overflow tube expels coolant during normal driving as the system heats up and the coolant expands into that space. You will find a puddle of coolant under the car and — if you do not know about this — assume you have a leak and take the car to a mechanic for an expensive leak investigation. Stop at MAX.
Mistake 5: Using Tap Water for Diluting Concentrate
Tap water contains dissolved minerals — calcium carbonate, magnesium, chlorides — at concentrations that vary significantly by location. Hard water areas have high mineral content. When these minerals circulate through the cooling system at 200°F+ temperatures, they precipitate out of solution and form scale deposits on heat transfer surfaces. Scale on the inside of a radiator tube acts as insulation — it reduces heat transfer efficiency dramatically. The water pump, thermostat, and small passages in the heater core also accumulate scale. Distilled water costs $1–$2 per gallon. It has zero mineral content. Always use distilled water for diluting coolant concentrate — never tap water, never bottled spring water (which contains minerals), and never sparkling water.
How Often Should You Check and Add Coolant?
| Situation | Check Frequency | Top Up When |
|---|---|---|
| Normal vehicle, no known issues | Every oil change (3,000–10,000 miles) | Level below midpoint between MIN and MAX |
| High mileage vehicle (100K+ miles) | Monthly visual check | Any drop below midpoint |
| Before any road trip over 100 miles | Every time | If below MAX — top up before departure |
| After overheating episode | Immediately after cooling + again 24 hours later | Any level below MAX after an overheating event |
| If you suspect a leak | Daily until leak is diagnosed | To maintain safe operating level while diagnosing |
| Seasonal check (winter onset) | Once before first freeze | If level is low going into cold weather |
Is It Safe to Drive with Low Coolant?
| How Low Is It? | Safe to Drive? | Distance Limit | Risk |
|---|---|---|---|
| Just below MAX — within the MIN/MAX range | ✅ Yes | Normal driving | None — system has adequate coolant |
| At the MIN line | ⚠️ Short distance only | Drive to auto parts store only | Rising temperature risk on long or hot drives |
| Below MIN — reservoir nearly empty | ❌ Not recommended | Drive to immediate top-up only | Overheating risk increases significantly |
| Reservoir completely empty | 🚨 Stop immediately | Zero — pull over | Overheating and engine damage imminent |
| Low + temperature gauge rising | 🚨 Stop now | Pull over immediately | Engine damage actively occurring |
Frequently Asked Questions
How do you add coolant to a car?
To add coolant: park on level ground, wait for the engine to be completely cold (minimum 30 minutes after shutdown), locate the translucent coolant reservoir near the radiator, check the fluid level against the MIN and MAX markings, verify the correct coolant type for your vehicle from your owner’s manual, slowly pour the correct pre-mixed coolant into the reservoir using a funnel until the level reaches MAX, replace the cap firmly, and start the engine to verify the temperature gauge remains in the normal range. Never open the cooling system on a hot engine — the pressurized system can spray scalding coolant.
What type of coolant does my car need?
The correct coolant type depends on your vehicle’s make, model, and year — and is specified in your owner’s manual under the fluids section. Toyota and Lexus typically require HOAT pink coolant. Honda uses OAT blue coolant. GM vehicles with Dex-Cool require OAT orange coolant. Ford uses HOAT gold coolant in most models from 2002 onward. European vehicles including BMW, Mercedes, VW, and Audi have specific HOAT specifications that must be matched. Color alone is not a reliable indicator of chemistry type — always confirm the required specification from your owner’s manual before purchasing.
Can I use water instead of coolant in an emergency?
In a genuine emergency where the engine is about to overheat and no coolant is available, plain distilled water is acceptable as a temporary measure — it will keep the engine from seizing long enough to reach a shop. Tap water works in an absolute emergency but is not ideal due to its mineral content. Never use salt water. After any plain-water top-up, have the cooling system properly tested and refilled with the correct coolant mixture as soon as possible — water alone provides no freeze protection, no boil-over protection above 212°F, and no corrosion inhibition.
How long does coolant last in a car?
IAT green coolant lasts approximately 2 years or 30,000 miles. OAT and HOAT coolants (orange, pink, blue, gold) last approximately 5 years or 150,000 miles under normal conditions. However, these intervals assume a properly sealed cooling system without contamination. A cooling system that has had water intrusion, oil contamination, or incompatible coolant mixing will need the coolant changed sooner. Most modern vehicles only need a coolant flush every 5 years as part of routine maintenance.
What happens if you overfill coolant?
Overfilling the coolant reservoir causes excess coolant to be expelled through the overflow tube when the engine heats up and the coolant expands. You will find a puddle of coolant under the car after driving — this is not a leak, it is overflow from overfilling. To correct overfilling, use a turkey baster or coolant extraction pump to remove excess coolant from the reservoir until the level sits at or slightly below the MAX line when cold.
Related Guides
Coolant is one part of your engine’s temperature management system. If your car has been overheating, our emergency guide on car overheating — what to do immediately gives you the exact 8-step sequence to prevent engine damage. For understanding why your temperature gauge behaves the way it does, see our guide on car smells like burning oil — overheating and oil burning symptoms often appear together. And if you noticed your coolant reservoir was bone dry, our engine oil check guide shows how to do a complete under-hood fluid inspection at the same time.