How to Check Your Car’s Engine Oil Correctly
Checking your car’s engine oil is one of the simplest ways to maintain your vehicle and keep its engine running smoothly. Engine oil lubricates moving parts, reduces friction, helps control heat, and protects internal components from excessive wear. When the oil level becomes too low or the oil deteriorates, the engine may develop serious problems that can lead to expensive repairs.
Fortunately, you do not need to be a professional mechanic to check your engine oil. With a few simple tools and the correct procedure, you can inspect the oil level at home and identify potential problems before they become serious.
In this guide, you will learn how to check your car’s engine oil correctly, understand the results, and know when to add or change the oil.
Why Is It Important to Check Your Engine Oil?
Engine oil plays an essential role in protecting your car’s engine. As the engine runs, its internal components move at high speeds and generate friction and heat. Oil forms a protective layer between these moving parts, helping them operate efficiently.
Checking your engine oil regularly helps you:
- Prevent engine damage caused by low oil levels.
- Identify possible oil leaks early.
- Maintain proper engine lubrication.
- Recognise when the oil needs changing.
- Reduce the risk of expensive engine repairs.
- Improve the reliability and lifespan of your vehicle.
Making engine oil checks part of your regular car maintenance routine can help you detect problems before they affect engine performance.
What You Need Before Checking Engine Oil
Before starting, make sure you have the following:
- A clean cloth or paper towel.
- Your vehicle’s owner’s manual.
- Engine oil of the correct specification, if topping up is necessary.
- A pair of gloves, if preferred.
Most vehicles have an engine oil dipstick that allows you to measure the oil level. However, some newer cars use an electronic oil-level monitoring system instead.
Check your owner’s manual to find out which system your vehicle uses and follow the manufacturer’s instructions.
Step 1: Park Your Car on Level Ground
The first step is to park your car on a flat, level surface. Checking the oil while the vehicle is parked on a steep slope may produce an inaccurate reading because the oil can collect unevenly inside the engine.
Switch off the engine, engage the parking brake, and ensure the vehicle is secure.
For most cars, it is best to check the oil after the engine has been switched off for several minutes, allowing the oil to drain back into the oil pan. Some manufacturers recommend checking the oil when the engine is cold, while others specify a warm-engine procedure.
Important: Follow your vehicle manufacturer’s instructions for the correct engine temperature and waiting time.
Step 2: Locate the Engine Oil Dipstick
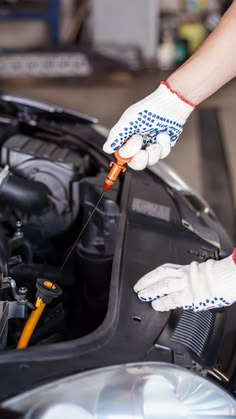
Open the bonnet and locate the engine oil dipstick. It usually has a brightly coloured handle, often yellow or orange, although the design varies between vehicles.
If you are unfamiliar with the engine compartment, consult your owner’s manual to identify the correct dipstick.
Do not confuse the engine oil dipstick with other components, such as the transmission fluid dipstick found in some vehicles.
If your car does not have a traditional dipstick, it may use an electronic oil-level measurement system that can be accessed through the dashboard or vehicle settings.
Step 3: Remove and Clean the Dipstick
Once you have located the dipstick, carefully pull it out of its tube.
Use a clean cloth or paper towel to wipe away the oil on the measuring end. This removes the existing oil so you can obtain an accurate reading.
After cleaning it, insert the dipstick fully back into its tube. Make sure it is properly seated before removing it again.
This second reading is the one you should use to determine the engine oil level.
Step 4: Check the Oil Level
Remove the dipstick again and examine the oil markings near its tip. Most dipsticks have two marks labelled MIN and MAX, or similar indicators showing the minimum and maximum safe oil levels.
The oil level should generally fall between these two marks.
Here is how to interpret the result:
- Oil between MIN and MAX: The oil level is generally acceptable.
- Oil close to MIN: The level is low enough that you should check the manufacturer’s guidance and consider topping it up.
- Oil below MIN: Add the correct oil before driving, following the manufacturer’s instructions.
- Oil above MAX: The engine may be overfilled and may require correction.
If the dipstick appears dry, do not assume the engine is safe to operate. Check the oil again using the correct procedure and consult the owner’s manual if necessary.
Running an engine with insufficient oil can cause severe internal damage.
Step 5: Examine the Condition of the Oil
Checking the oil level is important, but you should also look at the oil’s condition.
Fresh engine oil can range from amber to darker shades, depending on its type and use. As the engine runs, the oil often becomes darker because it collects contaminants and combustion by-products.
Dark oil does not automatically mean it needs immediate replacement. Instead, consider the manufacturer’s recommended service interval, the oil’s condition, and any warning signs.
Pay attention to the following:
Milky or creamy oil: This may indicate that coolant is mixing with the engine oil, although some moisture-related condensation can also cause deposits under certain conditions. Have the engine inspected if the appearance is persistent or accompanied by coolant loss or overheating.
Burnt smell: A strong burnt smell may indicate overheating, degraded oil, or another engine problem.
Metallic particles: Visible metal particles in the oil may indicate internal engine wear and should be investigated.
Unusually low oil level: If the oil level drops repeatedly between services, the engine may be leaking oil or burning it internally.
If you notice unusual oil conditions, seek professional advice rather than relying on appearance alone.
Step 6: Add Engine Oil If Necessary
If the oil level is below the recommended range, you may need to add oil.
First, confirm the correct oil specification and viscosity from your owner’s manual. Using the wrong oil can affect lubrication and engine performance.
Locate the engine oil filler cap, which is usually marked with an oil-can symbol. Remove the cap and add a small amount of the recommended oil.
Wait briefly, then check the dipstick again. Repeat the process gradually until the level reaches the appropriate range.
Avoid adding too much oil. Overfilling can cause foaming, increased pressure in certain engine systems, leaks, or other mechanical problems.
Once the level is correct, securely replace the oil filler cap and ensure the dipstick is fully inserted.
How Often Should You Check Your Engine Oil?
The ideal checking frequency depends on your vehicle, engine type, age, and driving conditions.
As a general habit, check the engine oil every few weeks and before long journeys. Older vehicles, cars with known oil consumption, and vehicles used for demanding driving may require more frequent checks.
You should also check the oil if the dashboard displays an oil-level warning or if you notice signs of a leak.
Remember that an oil pressure warning is different from a low oil-level warning. If the red oil pressure warning light appears while the engine is running, stop safely and switch off the engine as soon as possible. Do not continue driving until the cause has been identified.
Common Mistakes to Avoid When Checking Engine Oil
To get an accurate reading and protect your engine, avoid these common mistakes:
- Checking the oil while the car is parked on an uneven surface.
- Using the wrong dipstick or confusing it with another fluid measurement.
- Failing to wipe and reinsert the dipstick before taking a reading.
- Adding oil without checking the recommended specification.
- Overfilling the engine with oil.
- Ignoring repeated oil loss or signs of contamination.
- Continuing to drive when an oil pressure warning appears.
Taking a few extra minutes to follow the correct procedure can help prevent avoidable engine problems.
Conclusion
Knowing how to check your car’s engine oil correctly is an important part of vehicle maintenance. By parking on level ground, following the manufacturer’s instructions, using the dipstick properly, checking the oil condition, and adding the correct oil when necessary, you can help protect your engine from unnecessary wear and damage.
Make oil checks part of your regular maintenance routine, especially before long trips. If you notice persistent oil loss, unusual oil appearance, leaks, or warning lights, have your vehicle inspected by a qualified mechanic.
A simple engine oil check can help you identify problems early, reduce repair costs, and keep your car running reliably for longer.