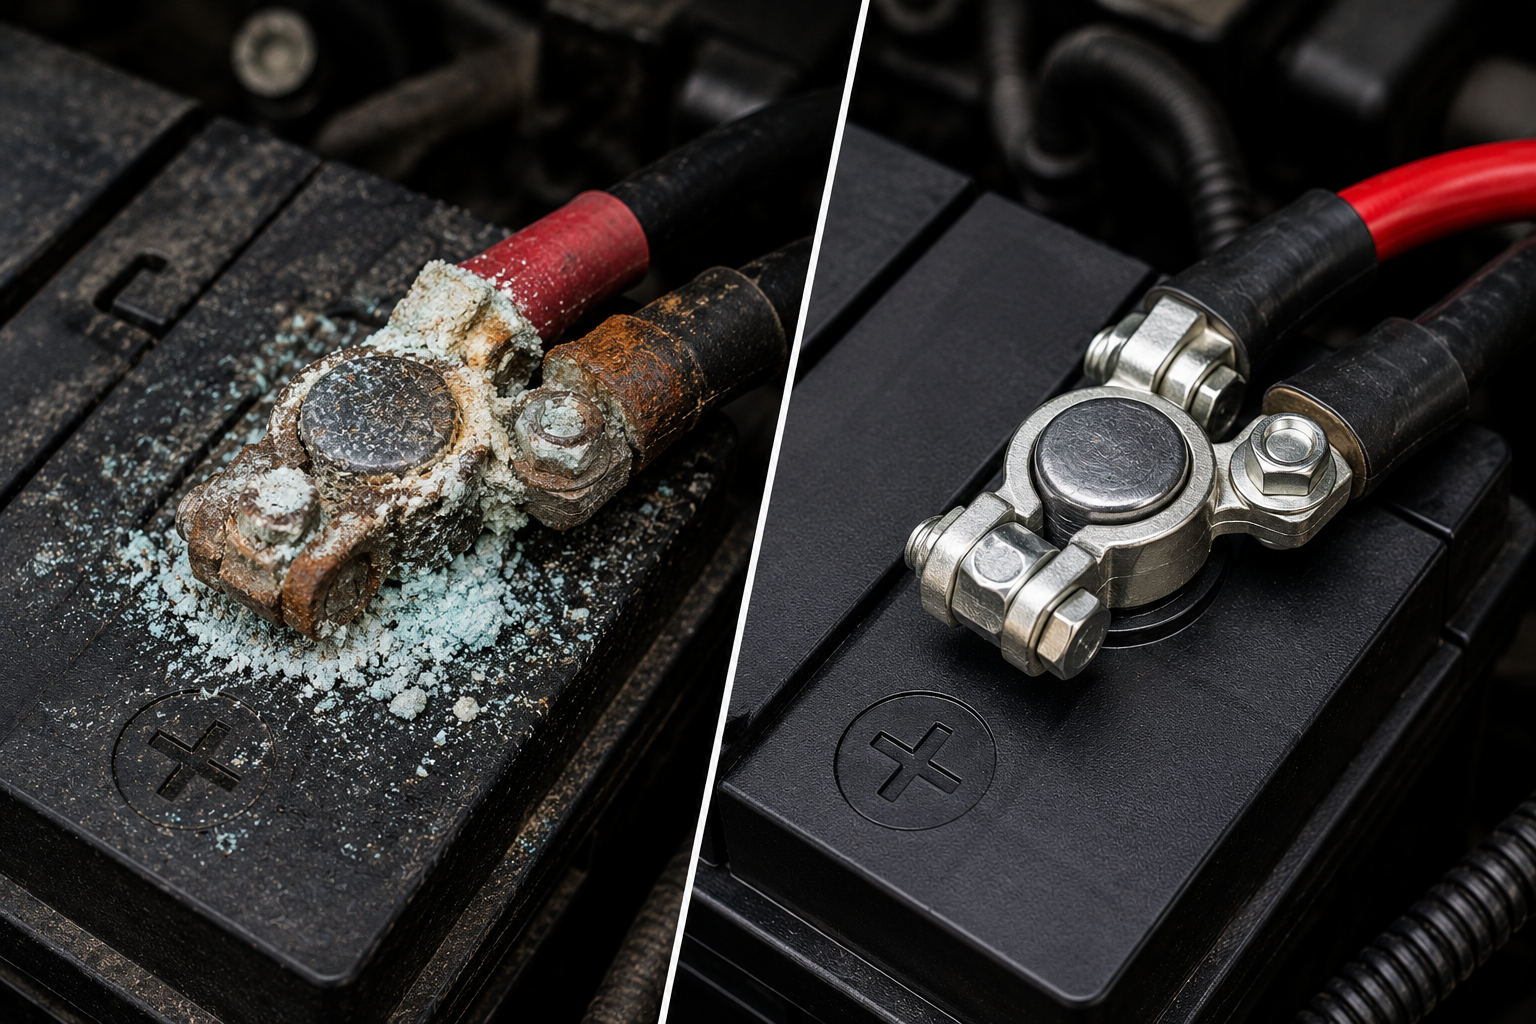
White, blue, or greenish powder on your battery terminals is corrosion — a mineral buildup that acts as an electrical insulator between your battery and the cables connected to it. Even a thin layer of corrosion increases resistance in the circuit enough to prevent reliable starting, cause dim lights, and trigger mysterious electrical faults. The fix takes ten minutes, costs nothing if you have baking soda at home, and resolves a surprising number of problems that drivers assume require a new battery or an expensive electrical diagnosis.
Here is something most car owners do not know: your battery could be perfectly healthy — full charge, passes every test — and still cause no-start symptoms if the terminals connecting it to the car’s electrical system are corroded. The battery has plenty of power. The corrosion is blocking it from getting out. This is why buying a new battery sometimes fails to fix a car that would not start — the real problem was a dirty connection that a $0 baking soda cleaning would have solved.
What Battery Terminal Corrosion Actually Is
Battery terminals corrode through a chemical process that involves the battery’s internal chemistry and its operating environment. Lead-acid batteries — which includes every standard 12-volt car battery — produce hydrogen gas during charging and discharging. This hydrogen gas escapes through the battery vents and contacts the metal terminal posts and clamps. In the presence of moisture and air, it reacts to form lead sulfate and other compounds that appear as the white, blue-green, or grey powder you see on corroded terminals.
The color of the corrosion tells you something about which terminal is the primary source and what is driving it.
| Corrosion Color | What It Indicates | Most Common Cause |
|---|---|---|
| White or off-white powder | Lead sulfate — standard battery corrosion | Normal battery aging and outgassing |
| Blue or blue-green powder | Copper sulfate — copper cable reacting | Overcharging, battery acid contact with copper cable |
| Green powder on copper cable | Copper oxidation | Moisture in the cable, age |
| Heavy corrosion on positive terminal only | Overcharging from alternator | Alternator voltage regulator fault |
| Heavy corrosion on negative terminal only | Undercharging — battery working harder | Short trips, parasitic drain, weak alternator |
| Corrosion on both terminals equally | Battery end-of-life outgassing | Battery 4–5+ years old |
| Wet corrosion — damp or oily | Battery acid seeping from cracked case | Overfilling, cracked battery — replace immediately |
The location pattern matters particularly. Corrosion forming primarily on the positive terminal suggests the battery is being overcharged — excess voltage drives hydrogen gas production. Corrosion primarily on the negative terminal suggests undercharging — the battery is chronically not reaching full charge and is working harder during each discharge cycle. If your car is primarily used for very short trips where the alternator never has time to fully recharge the battery, negative terminal corrosion is the predictable result.
What Corroded Terminals Actually Do to Your Car
Electricity follows the path of least resistance. Corroded terminals add resistance — sometimes a small amount, sometimes a significant amount depending on buildup severity. Here is the progression of what happens as corrosion worsens:
- Early stage — light corrosion: No noticeable symptoms. The car starts normally, all accessories function, but the charging circuit is slightly less efficient. The battery charges slightly slower and discharges slightly faster than it should.
- Moderate corrosion: Occasional slow cranking — the engine turns over sluggishly during cold morning starts or after the car has sat for several days. Lights may dim noticeably when the engine is at idle. Radio or other accessories may reset occasionally if they lose power momentarily during a high-current event like startup.
- Heavy corrosion: Intermittent no-start — the car starts fine sometimes and refuses to crank at all other times depending on temperature and electrical load. The resistance across the terminal connection varies with temperature (terminals expand and contract, changing contact quality), producing the intermittent symptom that is one of the most frustrating electrical problems to diagnose.
- Severe corrosion: Complete no-start. The corroded connection has so much resistance that starter motor current cannot flow adequately. The car may click rapidly (rapid click usually means battery fine but connection poor — see our car won’t start clicking guide) or show no response at all to the key.
How to Clean Battery Terminals — Complete Step-by-Step
What You Need
- Baking soda (one tablespoon) + water — OR a commercial battery terminal cleaner spray
- Old toothbrush or wire brush
- Clean rags or paper towels
- 8mm or 10mm wrench (most terminal clamps use one of these)
- Nitrile gloves — battery acid residue is caustic
- Safety glasses — baking soda reaction with acid residue can splatter
- Petroleum jelly (Vaseline) or battery terminal protector spray — for prevention after cleaning
Step 1 — Safety First: Turn Everything Off
Turn the ignition completely off. Turn off all accessories — lights, radio, climate control. Remove the key from the ignition. This is not optional: disconnecting a battery with the ignition on can cause voltage spikes that damage sensitive electronics on modern vehicles. Some vehicles store learned settings — radio presets, window positions, power seat memory, adaptive transmission learning — in RAM that is cleared when the battery is disconnected. Be aware of this before proceeding, though it is not a reason to avoid necessary cleaning.
Step 2 — Disconnect the Negative Terminal First
Always disconnect negative before positive — always. This sequence matters. If you disconnect the positive terminal first and your wrench accidentally contacts the car body while still connected to the positive post, you create a short circuit. The negative terminal is connected to the chassis ground — disconnecting it first breaks the circuit completely, making the positive terminal safe to work around.
Loosen the clamp bolt with an 8mm or 10mm wrench. Twist and pull the cable clamp off the terminal post — do not pry it with a screwdriver, as this can crack the battery case. If the clamp is stuck from corrosion, use a battery terminal puller tool ($8 at any auto parts store) or gently rock it back and forth while pulling upward. Lay the negative cable aside where it cannot accidentally contact the negative terminal post.
Step 3 — Disconnect the Positive Terminal
Same process on the positive terminal. Keep the cables from touching each other or the battery posts while you work. Many mechanics drape a rag over the positive post during cleaning as a visual reminder not to lay the positive cable across it.
Step 4 — Mix and Apply the Cleaning Solution
Mix one tablespoon of baking soda with one cup of warm water. This creates a mild alkaline solution that neutralizes the acidic corrosion compounds. Pour it directly over the corroded areas — you will see it fizz and bubble as it reacts with the corrosion. This fizzing is the reaction working. Let it sit for 30 to 60 seconds, then scrub with the toothbrush or wire brush. Work the brush around the terminal post, inside the cable clamp, and along the sides of the battery case where corrosion has run down.
Commercial battery terminal cleaner spray (available at any auto parts store for $5 to $8) works identically — it typically contains a pH indicator that turns a different color when the reaction is complete, which is a useful visual confirmation. If you prefer the commercial option, it is equivalent to the baking soda method in effectiveness.
Step 5 — Rinse and Dry Completely
Rinse the terminal posts, clamps, and surrounding battery top with plain water to remove all baking soda residue. Baking soda left on the terminals is mildly corrosive over time — rinse it off completely. Dry everything thoroughly with a clean rag. The connection you are about to make is between bare metal — any remaining moisture accelerates future corrosion.
Step 6 — Inspect the Terminals and Cables
With the terminals clean, inspect them carefully before reconnecting. Look at the battery terminal posts — they should be smooth, slightly tapered cylinders. Any pitting, cracks, or the terminal being loose or wobbly in the battery case means the battery needs replacement regardless of charge level. Look at the cable clamps — they should be intact, round, and able to clamp tightly around the terminal post. A clamp that is cracked, rounded out (no longer grips firmly), or has wire strands broken at the clamp connection needs replacement.
This inspection takes 60 seconds and catches the most common reason cleaning fails to fix the problem: a cable clamp that has corroded internally to the point that the metal-to-metal contact area is insufficient regardless of how clean the outside appears. If the cable insulation near the clamp is cracked, brittle, or the wire beneath looks green or corroded — the cable needs replacement, not just cleaning.
Step 7 — Apply Corrosion Protection
Before reconnecting, apply a thin layer of petroleum jelly (Vaseline) or battery terminal grease to the terminal posts and the inside of the cable clamps. This coating does two things: it excludes oxygen and moisture from the metal surface, which is what drives corrosion formation, and it provides a conductive grease medium that maintains good electrical contact at the interface. Do not skip this step — it significantly extends the interval between cleanings.
Alternatively, battery terminal protector spray (red and green felt terminal washers are a common product) goes between the cable clamp and the terminal post and serves the same function. These cost $3 to $5 per pair and last 1 to 2 years before needing replacement.
Step 8 — Reconnect Positive First, Then Negative
Reconnect in the reverse order of disconnection: positive terminal first, then negative. Push the cable clamp down firmly over the terminal post — it should sit flush at the base of the post with no wobble. Tighten the clamp bolt until the clamp is firmly seated — snug, not overtightened (overtightening cracks plastic battery cases). Test by trying to twist the cable clamp by hand after tightening — it should not move at all.
Start the car. It should start normally, and any voltage-related symptoms from before the cleaning should be resolved immediately if corroded terminals were the cause.
When Cleaning Is Not Enough — Replace the Terminals
| Condition | Clean or Replace? | Cost to Replace |
|---|---|---|
| Light to moderate surface corrosion — clamp still round and grips firmly | ✅ Clean | $0 — cleaning only |
| Heavy corrosion — clamp still structurally intact | ✅ Clean thoroughly | $0 — cleaning only |
| Clamp is oval/rounded — no longer grips terminal post firmly | 🔴 Replace clamp | $5–$25 per clamp |
| Cable insulation cracked or wire corroded under insulation | 🔴 Replace cable | $20–$60 per cable |
| Terminal post loose or wobbly in battery case | 🔴 Replace battery | $80–$200 for battery |
| Battery case cracked or wet with acid seeping | 🚨 Replace battery immediately | $80–$200 — safety risk |
| Corrosion returning within weeks of cleaning | ⚠️ Find root cause | Test charging system |
Why Does Corrosion Keep Coming Back?
Corrosion that returns quickly after cleaning — within weeks or a few months rather than years — signals an underlying cause that cleaning alone will not address.
- Overcharging alternator: An alternator producing over 14.7 volts drives excessive hydrogen outgassing from the battery, producing rapid positive terminal corrosion. Test alternator output voltage — anything above 15 volts with the engine running indicates a faulty voltage regulator. See our alternator vs battery guide for the complete voltage test.
- Old or failing battery: A battery at end of life outgasses more than a healthy battery during normal charging cycles. If your battery is 4 years or older and corrosion is forming rapidly, have the battery load tested. Rapid corrosion is sometimes the first sign of a battery entering failure mode.
- Cracked battery case: Acid seeping from a hairline crack in the case reacts with the terminals and surrounding components. This is identifiable by wet, heavy corrosion that appears at the base of the terminal post rather than on the post itself. A cracked battery case requires immediate battery replacement — battery acid on engine components causes damage and is a safety risk.
- Short trip driving: Cars driven primarily on trips under 5 to 10 minutes never allow the alternator to fully recharge the battery. The battery cycles between partial charge states, accelerating sulfation and increasing outgassing. Occasional longer drives help, as does a battery maintainer for vehicles driven infrequently.
Positive vs Negative Terminal — What Each Connects To
Understanding what each terminal connects to helps you understand why both must be clean and tight — and why the negative terminal is often overlooked despite being equally important.
| Terminal | Symbol/Color | Connects To | What Happens If Connection Fails |
|---|---|---|---|
| Positive (+) | Red / (+) symbol / larger post on most batteries | Starter motor, fuse box, alternator output | No power to any electrical system — complete no-start, no dash lights |
| Negative (–) | Black / (–) symbol | Engine block ground, chassis ground, ECU grounds | Poor ground = intermittent faults, error codes, weird electrical behavior |
The negative terminal is the ground return path for every electrical circuit in the vehicle. A poor negative terminal connection does not just affect starting — it affects every ground-referenced signal in the ECU, sensors, and control modules. This is why corroded negative terminals sometimes produce seemingly unrelated problems: random error codes, sensors behaving erratically, modules not communicating, warning lights with no obvious cause. Before any complex electrical diagnosis on a modern vehicle, always check and clean both battery terminals. It is the most common overlooked step that mechanics skip when presented with complex electrical complaints.
Frequently Asked Questions
What does corrosion on battery terminals mean?
Corrosion on battery terminals is a buildup of lead sulfate, copper sulfate, and other compounds formed when hydrogen gas from the battery reacts with moisture, air, and the metal of the terminal posts and cable clamps. It acts as an electrical insulator, increasing resistance at the battery connection and reducing the current that can flow to the starter motor and electrical systems. Even light corrosion affects starting reliability and charging efficiency. White or blue-green powder is the most common appearance.
Can corroded battery terminals prevent a car from starting?
Yes — heavily corroded battery terminals are one of the most common causes of no-start and intermittent starting problems, and one of the most frequently overlooked. The corrosion layer has high electrical resistance that prevents adequate current from reaching the starter motor. The car may click rapidly when the key is turned (current gets through but not enough for the starter) or show no response at all. Cleaning the terminals costs nothing and resolves a significant percentage of battery-related starting problems without any part replacement.
How do I clean corroded battery terminals?
Mix one tablespoon of baking soda in one cup of warm water. Turn off the ignition and disconnect the negative terminal first, then the positive. Pour the baking soda solution over the corroded terminals — it will fizz as it neutralizes the acid compounds. Scrub with an old toothbrush or wire brush. Rinse with plain water and dry thoroughly. Before reconnecting, apply petroleum jelly or battery terminal grease to the posts and clamp interiors. Reconnect positive first, then negative. The whole process takes 10 to 15 minutes.
Which terminal do I disconnect first when cleaning?
Always disconnect the negative terminal first when removing a battery or cleaning terminals. If you disconnect the positive first and your wrench contacts any metal on the car body while connected to the positive post, it creates a short circuit through the chassis. Disconnecting the negative first breaks the circuit completely, making all subsequent work safe. Reconnect in the reverse order — positive first, then negative.
How often should I clean battery terminals?
Inspect battery terminals at every oil change — approximately every 3,000 to 7,500 miles. Light corrosion should be cleaned when noticed rather than left until it worsens. A battery in good health with proper charging system function typically needs terminal cleaning once every 1 to 2 years. Rapid corrosion formation — returning within weeks of cleaning — indicates an underlying cause such as overcharging, battery end of life, or a cracked battery case that requires diagnosis rather than repeated cleaning.
Related Guides
Battery terminal cleaning is the first step in diagnosing most battery-related problems. If cleaning the terminals does not resolve your starting issue, our car won’t start clicking noise guide diagnoses the specific click pattern to determine if the battery, starter, or connection is the real cause. If the battery light illuminated on the dashboard alongside terminal issues, read our battery warning light guide — corrosion can trigger a false charging system alert. And if your battery keeps draining overnight despite clean terminals, our car battery draining overnight guide covers the parasitic drain diagnosis.