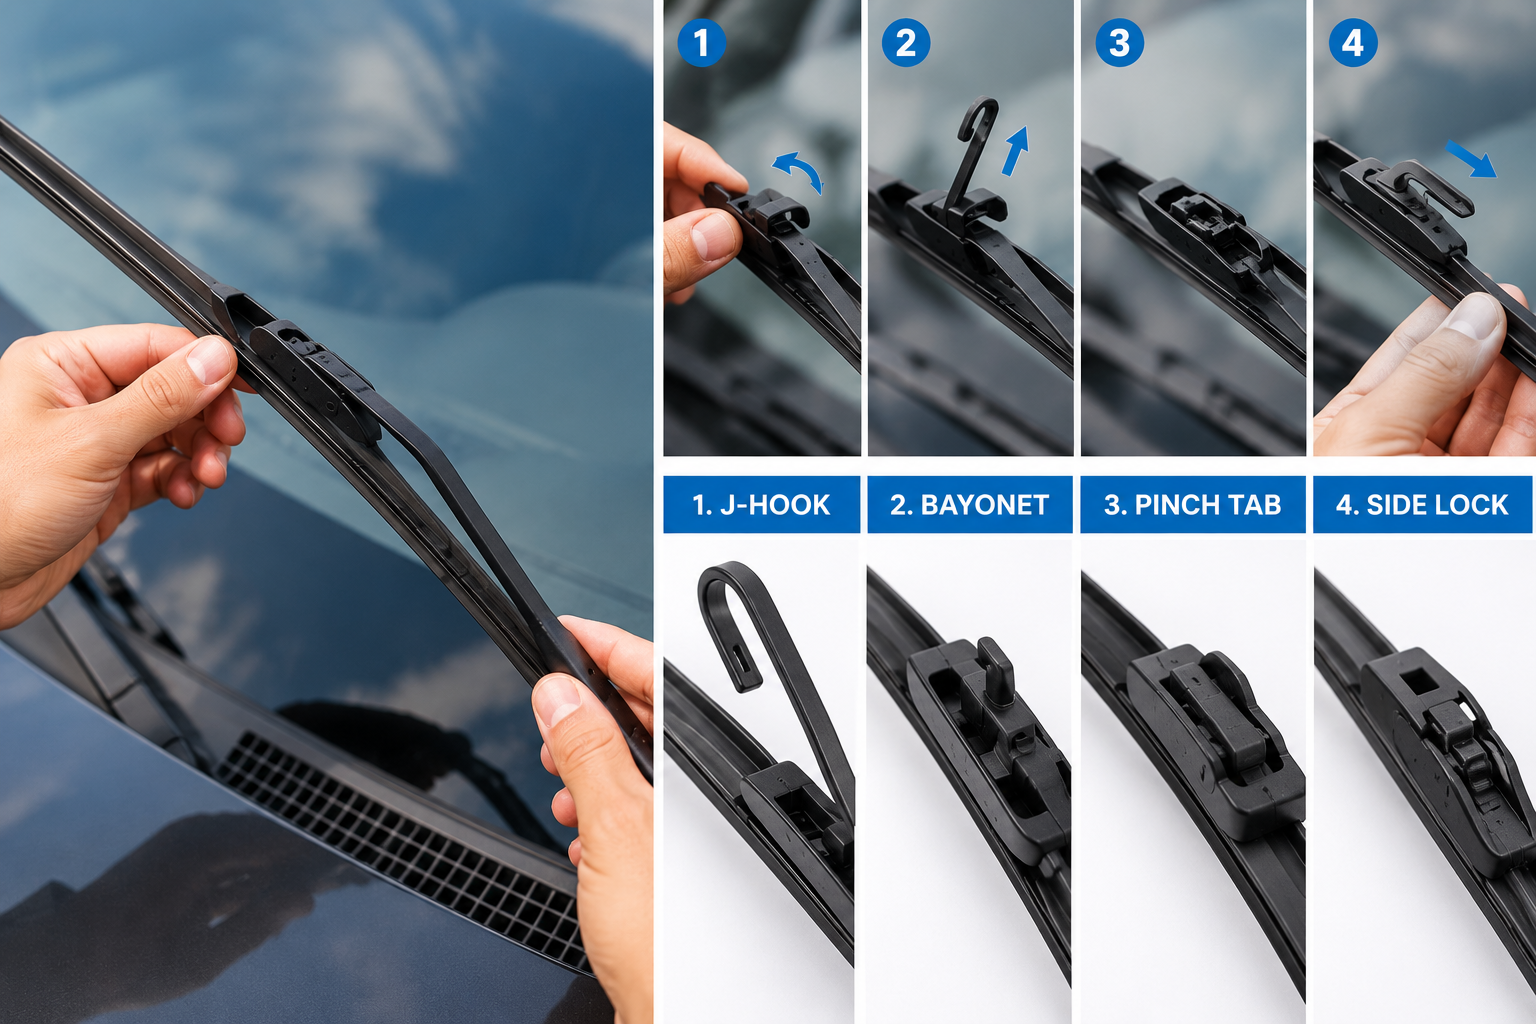
Changing wiper blades is a 10-minute job on every car — but only if you know which of the four connector types your vehicle has. The hook-type is by far the most common and uses a J-shaped hook on the wiper arm that slots into a notch on the blade. The pin-type uses a straight pin through a hole in the blade connector. The pinch-tab type requires squeezing a tab while pulling. The side-pin type connects from the side of the blade rather than the bottom. Use the wrong removal method and you either cannot release the blade or risk bending the wiper arm. Identify your type first — the step-by-step instructions below are organized by connector type.
Here is the frustrating experience most drivers have when attempting this for the first time: they buy new wiper blades, lift the arm, and stare at the connection point with no idea how the old blade comes off. They pull, twist, squeeze — sometimes breaking a tab in the process. Then they go to the auto parts store and ask someone to show them, feeling like they should have known. The truth is that wiper blade removal is genuinely different across the four major connector systems, and instructions that work for one simply do not apply to another. This guide maps out every type so you are not guessing.
Step 1: Find the Right Blade Size Before Buying
Most vehicles use different length wiper blades on the driver and passenger sides. Installing the wrong length means the blade either does not reach the full sweep arc or extends beyond it — both reduce visibility and can cause the blade to contact the A-pillar or hood during operation. There are three reliable ways to find the correct size:
- Fitment guide at the auto parts store: Every major auto parts retailer — AutoZone, O’Reilly, NAPA, Advance Auto — has a physical blade fitment guide near the wiper blade display. Find your year, make, and model in the book. It lists driver side and passenger side lengths separately. This takes about 60 seconds and is the most reliable method.
- Owner’s manual: Listed under “maintenance specifications” or “wiper blades” in the index. More reliable than the internet for older or less common vehicles.
- Measure the existing blades: Measure each blade from tip to tip while still on the car. Most wiper blades come in 1-inch increments — round to the nearest inch. Keep driver and passenger sides separate.
- Online vehicle lookup: Most wiper blade brand websites have a vehicle lookup tool — enter year, make, model and it returns the correct size for front driver, front passenger, and rear wiper if equipped.
Beam vs Conventional vs Hybrid — Which Type of Blade to Buy
| Blade Type | Construction | Best For | Cost | Lifespan |
|---|---|---|---|---|
| Conventional (framed) | Metal frame with rubber insert | Mild climates, budget replacement | $8–$20 each | 6–12 months |
| Beam (bracketless) | Single curved piece of spring steel encased in rubber | All climates, best ice and snow performance | $18–$45 each | 12–24 months |
| Hybrid | Rigid shell covering an internal beam | Mixed conditions, balance of protection and performance | $15–$35 each | 12–18 months |
Beam blades outperform conventional blades in almost every condition — they maintain even pressure across the entire wiper arc, do not collect ice and snow in the frame, and last significantly longer. The higher upfront cost is recovered in extended service life and better visibility. If your budget allows one upgrade on routine maintenance, beam blades are one of the highest-value choices available. Many modern vehicles come from the factory with beam blades — check your existing blade’s construction before replacing with conventional.
Step 2: Identify Your Connector Type
Before lifting the wiper arm, look at the wiper arm itself. The end of the arm — where it connects to the blade — determines which type you have. Most blades are designed to fit multiple connector types with included adapters, but knowing your type lets you prepare the correct removal method.
| Connector Type | What It Looks Like | Common On | Approximate Prevalence |
|---|---|---|---|
| Hook / J-hook | J-shaped metal hook at end of arm, curves down into blade connector | Most North American and Japanese vehicles | ~70% of vehicles |
| Pinch tab | Small plastic tab that must be squeezed while blade is pushed toward hook | Many European and some Japanese vehicles | ~15% of vehicles |
| Side pin | Pin enters blade connector from the side rather than bottom | Some Volkswagen, Audi, BMW models | ~8% of vehicles |
| Top lock / pin | Straight pin enters hole in top of blade connector, pressed from above | Older Ford, some Chrysler models | ~7% of vehicles |
Safety Step: Protect Your Windshield
Before lifting any wiper arm, place a folded towel, piece of cardboard, or thick cloth on the windshield directly below each wiper arm. Wiper arms contain a coiled spring that holds the blade against the glass — if the arm snaps back down without a blade attached, the bare metal arm strikes the glass with significant force and cracks or chips it. This happens fast and unexpectedly. The towel takes five seconds to place and prevents an expensive windshield repair.
How to Change Wiper Blades — By Connector Type
Method 1 — Hook / J-Hook Connector (Most Common)
- Lift the wiper arm away from the windshield until it locks in the upright position (approximately 90 degrees). Place your towel on the windshield now.
- Rotate the blade perpendicular to the arm — swing it 90 degrees so the blade is pointing away from the car rather than parallel to the arm.
- Locate the small release tab on the underside of the blade connector — the point where the blade meets the arm hook. Press this tab toward the blade while simultaneously pulling the blade down and away from the hook. The blade slides off the hook.
- Note the hook shape and orientation before installing the new blade. The hook has a specific curvature that the connector must align with.
- Take the new blade and identify the hook-type adapter — it is the J-shaped slot that accepts the arm hook. If the new blade comes with multiple adapters, select the hook adapter by matching the shape to your arm’s hook.
- Align the blade connector with the arm hook. Hook the arm into the connector slot and push toward the arm until you hear and feel a firm click. This click is the lock tab engaging. No click means the connector is not seated — do not force it, recheck alignment.
- Rotate the blade back parallel to the arm and slowly lower the arm onto the windshield. Do not let it snap back.
Method 2 — Pinch Tab Connector
- Lift the wiper arm to the upright position. Place towel on windshield.
- Locate the pinch tab — a small plastic tab visible on the top or side of the connector where the blade meets the arm. It requires squeezing inward while the blade is pushed in a specific direction.
- Squeeze the pinch tab firmly with your thumb while pushing the blade toward the wiper arm pivot (inward, toward the car). This releases the locking mechanism. The blade slides off the arm in the direction you pushed.
- On the new blade, identify the matching adapter for your arm type. Most pinch-tab blades attach by pushing the connector onto the arm pin until the tab clicks into the locking position.
- Align, push firmly until you hear the click. Verify it is locked by pulling gently on the blade — it should not release without pressing the tab.
Method 3 — Side Pin Connector
- Lift the arm to upright position. Place towel.
- The side pin enters the blade connector from the left or right side rather than bottom. Locate the connector housing — it looks like a rectangular plastic block on the wiper blade near the arm connection point.
- Look for a small button or tab on the side of the connector housing. Press it while sliding the blade laterally (sideways) off the pin. The blade slides in the direction opposite the tab press.
- On the new blade, the side-pin adapter is typically a separate piece included in the packaging. Install it onto the blade connector per the package instructions before attaching to the arm.
- Slide the blade onto the arm pin from the side. You should feel positive engagement when the connector is fully seated.
Method 4 — Top Lock / Pin Connector
- Lift the arm to upright position. Place towel.
- The top-lock pin is a straight peg that enters a hole in the top of the blade connector from directly above. No hook shape — the arm simply spears down through the connector.
- Press the release tab on the front or side of the connector while lifting the blade upward, off the pin. The blade comes straight up and off the arm.
- Install the new blade by aligning the hole in the top of the connector with the arm pin and pressing down firmly until it clicks. The pin should pass fully through the connector and the lock tab should engage automatically.
How to Change a Rear Wiper Blade
Rear wiper blades are simpler than front wipers because the rear arm typically uses a single connector type — usually a pin mount — and the blade is often shorter and less complex. The process differs in one important way: the rear arm pivot point is at the base of the rear window, and on many vehicles the arm stows in a different position. Do not lift a rear wiper arm past its intended range of motion — most rear arms are not designed to lock in an upright position and will spring back if released.
On hatchbacks and SUVs, the rear wiper arm often has a cover cap at the base that conceals a nut — this is for arm removal, not blade removal, and does not need to be touched during blade replacement. Lift the arm the few inches necessary to access the blade connector, swap the blade with the same connector method as above, and carefully return the arm to the glass. Rear wiper blades typically range from 10 to 16 inches and are found in the same fitment guide as front blades.
Why Your New Wiper Blades Are Streaking or Skipping
Installing new wiper blades and finding they streak or skip immediately is more common than it should be — and in most cases, the cause is not a defective blade.
| Problem After Installation | Likely Cause | Fix |
|---|---|---|
| Streaking — leaves water film rather than clearing | Manufacturing wax coating on new rubber | Run blades on wet glass for 5–10 cycles — coating wears off |
| Streaking continues past 10 cycles | Dirty windshield — wiper cannot clear contaminated glass | Clean windshield with glass cleaner and microfibre cloth |
| Skipping or chattering — bouncing instead of gliding | Blade not seated flat, wiper arm pressure imbalance, or silicone contamination on glass | Verify blade is fully clicked in, check arm spring tension, use glass cleaner |
| One blade performs fine, other skips | Wiper arm spring tension on the problem arm is weak | Check arm pressure — arm replacement may be needed if spring is weak |
| Smearing — pushes water sideways not clearing it | Blade installed backwards (less common) or wrong connector adapter used | Verify blade direction — edge contact must be sharp side down |
| Squeaking on every stroke | New rubber on clean dry glass, or dirty glass | Clean glass — blades should not squeak on wet glass |
New wiper blades from the factory are coated with a release agent from the manufacturing process. This coating causes streaking on the first few wiper cycles but wears off quickly. If your new blades stream or skip on the first use, run them through 10 to 15 full cycles on a wet windshield before concluding there is a problem. If streaking continues beyond that — clean the windshield thoroughly with a dedicated glass cleaner (not generic all-purpose cleaner which leaves residue) before making any other assessment.
When to Replace Wiper Blades — The 6 Signs
- Streaking at any point in the wiper stroke — the rubber edge has developed a flat spot, crack, or hardened section that does not maintain contact with the glass
- Skipping or chattering — the rubber has stiffened and lost flexibility, causing intermittent contact loss
- Squeaking on wet glass — not the same as squeaking on dry glass (which is normal) — wet-glass squeaking means the rubber compound has degraded
- Visible cracks, tears, or rubber splits — any physical damage to the rubber edge means replacement is overdue
- Blade leaves clear swipes but misses a band of water — the rubber has deformed and is no longer making uniform contact across its full length
- Blades have not been changed in 12 months — even blades that appear intact have degraded rubber that performs worse than new blades in heavy rain
How Often to Replace Wiper Blades
| Condition | Replacement Interval |
|---|---|
| Normal use, moderate climate, garaged vehicle | Every 12 months |
| Outdoor parking, sun exposure, extreme temperature swings | Every 6–8 months |
| Heavy rain climate (Pacific Northwest, Florida, etc.) | Every 6 months or at first sign of performance decline |
| Winter use — snow, ice, road salt | Every 6 months — or use dedicated winter blades seasonally |
| Beam blades | Every 18–24 months under normal conditions |
| Any blade used as an ice scraper | Immediately — ice scraping destroys rubber edges |
Frequently Asked Questions
How do you change wiper blades?
The process has four steps: find the correct blade size using the fitment guide at an auto parts store, place a protective towel on the windshield, lift the wiper arm to the upright position, and remove the old blade using the release method appropriate for your connector type — hook, pinch-tab, side-pin, or top-pin. Install the new blade by aligning the connector and pressing firmly until you hear a click confirming the lock has engaged. Lower the arm gently onto the windshield. The entire process takes 5 to 10 minutes per blade once you know your connector type.
How do I know what size wiper blades I need?
Use the vehicle fitment guide at any auto parts store — it lists driver and passenger side wiper blade lengths for every year, make, and model. Most vehicles use different lengths on each side. You can also check your owner’s manual under maintenance specifications, measure your existing blades from tip to tip, or use an online vehicle lookup on any wiper blade brand website. Never assume both sides are the same length — verify both separately.
How often should wiper blades be replaced?
Standard conventional wiper blades should be replaced every 6 to 12 months. Beam blades last 12 to 24 months. Blades exposed to extreme heat, outdoor parking, or winter conditions with ice and snow need replacement more frequently. The most reliable indicator is performance — if blades are streaking, chattering, or missing sections of the windshield, replace them regardless of age. Never use wiper blades as ice scrapers — a single scraping session on an icy windshield destroys the rubber edge.
Are all wiper blades the same connector?
No. Four main connector types exist: hook/J-hook (most common — approximately 70% of vehicles), pinch tab, side pin, and top lock/pin. Most aftermarket wiper blades come packaged with multiple adapter types to cover different connector styles, but you need to identify your vehicle’s specific connector before selecting the correct adapter from those included. Using the wrong adapter or failing to select any adapter at all is the most common installation error that results in a blade that will not click in or feels loose after installation.
Related Guides
Wiper blade replacement is part of routine vehicle maintenance — add it to the schedule in our complete car maintenance schedule alongside oil changes and tire rotations. For maintaining correct tire pressure which affects overall driving safety alongside wiper visibility, see our how to check tire pressure guide. And for a complete pre-winter vehicle preparation checklist that includes wipers, battery, and tire inspection, our car battery guide covers the cold weather battery checks that should accompany seasonal wiper blade changes.