How to check brake fluid involves two separate assessments — level and condition — and most drivers only do one. Checking the level is straightforward: locate the reservoir, read the MIN and MAX markings, top up if needed. Checking the condition is what most guides skip: brake fluid absorbs moisture continuously, and that moisture lowers the fluid’s boiling point. Fresh DOT 4 brake fluid boils at 446°F. DOT 4 fluid after 3 to 4 years in service typically boils at 270°F to 300°F. Under hard braking, fluid at that degraded boiling point can vaporize inside the caliper. Vapor does not transmit hydraulic pressure. The brake pedal goes to the floor. Old brake fluid is one of the most preventable causes of brake fade.
How to check brake fluid is one of those maintenance tasks that takes 60 seconds to perform correctly but has implications most drivers significantly underestimate. Unlike engine oil — which visibly darkens and gives obvious degradation signs — brake fluid can appear normal while its protective and safety properties have deteriorated substantially. The level check matters. The condition check is what actually protects you under the conditions where brakes are most stressed.
How to Check Brake Fluid — Complete Step by Step Process
Step 1: Find the Brake Fluid Reservoir
The brake fluid reservoir is a small, translucent plastic container on top of the brake master cylinder, located on the firewall on the driver’s side. On nearly all modern vehicles, the reservoir sits directly above the brake pedal when viewed from inside the engine bay. The cap is marked with a circle-and-dot symbol (the international brake symbol), the word “BRAKE FLUID,” or the DOT specification. The reservoir is typically white or translucent yellow and significantly smaller than the coolant overflow tank.
Critical warning before opening the cap: Brake fluid is highly hygroscopic — it absorbs moisture from the air rapidly. Do not leave the reservoir cap off longer than necessary. Do not check brake fluid on a rainy day or in very humid conditions if the reservoir will be open. Even brief exposure to humid air adds moisture to the fluid.
Step 2: Check the Brake Fluid Level
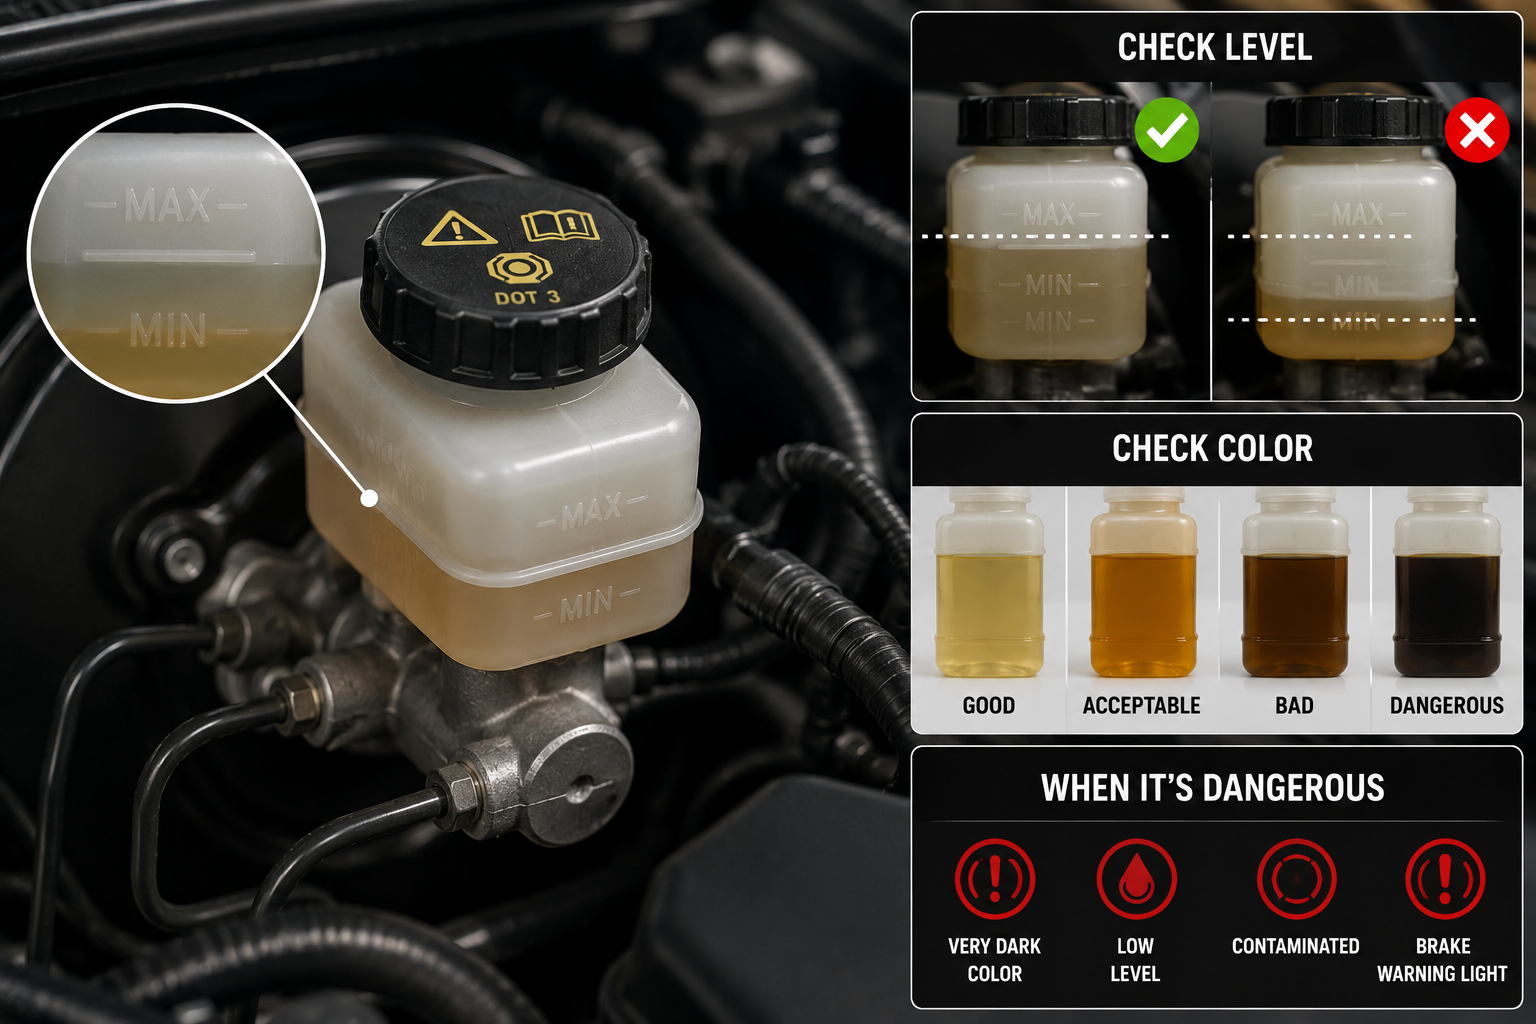
On most modern vehicles with translucent reservoirs, you can read the fluid level through the reservoir wall without removing the cap. Look for the MIN and MAX lines molded into the side. The fluid level should be between these two lines — closer to MAX is ideal, but anywhere between MIN and MAX is within the acceptable operating range.
| Level Reading | Meaning | Action |
|---|---|---|
| At or near MAX | Full — ideal | No action — proceed to color check |
| Between MIN and MAX | Acceptable operating range | Monitor — check color condition |
| At or near MIN | Low — needs attention | Top up AND investigate cause |
| Below MIN | Critically low — safety concern | Top up immediately — inspect for leaks |
| Cannot see fluid | Severely low or empty | Do not drive — inspect braking system |
Normal level decrease explained: When you check brake fluid level over time, it will drop slightly as brake pads wear. As pad friction material wears thinner, the caliper piston extends further and the reservoir supplies fluid to fill that volume. Gradual drop from MAX toward MIN over 20,000 to 30,000 miles is normal. Rapid drop after a recent brake service with new pads indicates a fluid leak requiring immediate inspection.
Step 3: Check Brake Fluid Color and Condition
This is the step most guides omit. When you check brake fluid color, you are assessing the most important safety-related property of the fluid — not just whether the level is correct.
| Fluid Color | Condition | Approximate Age | Action |
|---|---|---|---|
| Clear to very light yellow — transparent | Fresh — excellent | Recent change or new vehicle | No action needed |
| Light golden yellow — slightly amber | Good — some aging normal | 1–2 years in service | Monitor annually |
| Medium brown — noticeably darker | Degraded — moisture absorbed | 2–3 years in service | Plan flush within 6 months |
| Dark brown — significantly discolored | Significantly degraded | 3–5 years in service | Flush at next brake service |
| Black — opaque | Severely degraded — contaminated | 5+ years in service | Flush immediately — safety concern |
| Milky or cloudy — any color | Water contamination | Any age — system breach | Immediate professional inspection |
Why the Condition Check Matters — The Hygroscopic Science
When you check brake fluid condition, you are assessing its boiling point — not just its cleanliness. Brake fluid is hygroscopic — it chemically attracts and binds water molecules from the environment. This is a design feature, not a flaw. Glycol-based brake fluids intentionally absorb moisture rather than allowing free water droplets to form inside the system. Free water would pool at low points, freeze in cold weather, and corrode metal components. Absorbed moisture distributes evenly through the fluid — up to a point.
The safety threshold is approximately 3 to 4 percent moisture content by weight. At this level, the fluid’s boiling point has dropped significantly below its fresh specification. Fresh DOT 4 boils at 446°F. Moisture-contaminated DOT 4 at 3 percent water content boils at approximately 311°F — a 135°F reduction. Under hard braking — mountain descents, repeated highway stops, racing applications — caliper temperatures can exceed 300°F. Fluid at or near its boiling point vaporizes. Vapor compresses. The pedal sinks. This is why checking brake fluid condition, not just level, is a safety inspection.
How to Check Brake Fluid Type — DOT 3 vs DOT 4 vs DOT 5 vs DOT 5.1
The DOT specification on the reservoir cap is the only correct reference for your vehicle. When you check brake fluid type, use the cap label — never assume.
| DOT Type | Dry Boiling Point | Wet Boiling Point | Base | Common In |
|---|---|---|---|---|
| DOT 3 | 401°F (205°C) | 284°F (140°C) | Glycol ether | Older vehicles, light passenger cars |
| DOT 4 | 446°F (230°C) | 311°F (155°C) | Glycol ether + borate ester | Most modern European and performance vehicles |
| DOT 5 | 500°F (260°C) | 356°F (180°C) | Silicone — NOT glycol | Military, vintage, show vehicles — NOT ABS systems |
| DOT 5.1 | 500°F (260°C) | 356°F (180°C) | Glycol ether + borate — same as DOT 4 base | High-performance, heavy-duty braking |
The critical DOT 5 distinction: DOT 5 is silicone-based and completely incompatible with DOT 3, DOT 4, and DOT 5.1. DOT 5 cannot be used in vehicles with ABS systems — it introduces compressibility into the hydraulic circuit that interferes with ABS function. Never mix DOT 5 with any glycol-based fluid — the mixture gels and destroys brake system seals. The NHTSA brake safety standards specify minimum boiling point requirements for each DOT classification and the conditions under which each is appropriate.
How to Check Brake Fluid Level and Add Correctly
- Confirm the correct DOT specification from the reservoir cap or owner’s manual before purchasing any fluid.
- Clean the reservoir cap and surrounding area with a clean cloth before opening — any contamination that falls in circulates through the entire brake system.
- Remove the cap and set it upside down on a clean surface — do not let the rubber seal collect debris.
- Add fluid slowly in small increments using a clean funnel. Stop at the MAX line — do not overfill. Overfilled fluid has nowhere to expand when the system heats up.
- Replace the cap immediately and firmly — the rubber gasket seals against moisture ingress and must be seated correctly.
- Wipe any spilled fluid immediately with water — brake fluid strips automotive paint on contact within minutes.
When You Check Brake Fluid and the Level Is Low — What It Means
A brake fluid reservoir reading near MIN or below has one of two causes, and the correct response differs between them.
| Why the Level Is Low | Signs | Correct Response |
|---|---|---|
| Normal brake pad wear | Gradual level drop over 20,000-30,000 miles, no visible leaks, brakes feel normal | Top up AND inspect pad thickness — plan brake service if pads near worn |
| Fluid leak in the system | Rapid drop, wet spots near wheels, soft or spongy brake pedal | Do not just top up — find and repair the leak before further driving |
A brake pedal that sinks to the floor gradually while held steady, goes further than normal before resistance builds, or feels spongy rather than firm indicates air in the system from a leak requiring professional attention. For complete brake service guidance, see our brake pad lifespan guide covering the relationship between pad wear and fluid level drop.
How to Check Brake Fluid Age — Flush Intervals
| Vehicle Use | Recommended Flush Interval |
|---|---|
| Normal passenger car use, moderate climate | Every 2 years or 30,000 miles |
| Performance driving, track days, mountain driving | Annually — heat cycling accelerates moisture absorption |
| Heavy-duty — towing, hauling, commercial | Annually — sustained loads heat the fluid faster |
| Vehicles stored 6+ months between drives | Before return to service — static fluid absorbs moisture faster |
| After any brake system repair involving open lines | Full system bleed required — open lines introduce air |
When you check brake fluid and find dark brown or black fluid, flushing is overdue regardless of when the last service was. The Car Care Council identifies brake fluid inspection and replacement as one of the most commonly skipped but most safety-critical maintenance services on modern vehicles. A full brake fluid flush at a shop costs $80 to $150 — significantly less than the risk of brake fade from overheated degraded fluid.
Frequently Asked Questions — How to Check Brake Fluid
How do you check brake fluid?
To check brake fluid: locate the small translucent reservoir on top of the master cylinder on the driver’s side firewall, read the fluid level against the MIN and MAX lines visible through the reservoir wall without opening the cap, and assess the fluid color through the translucent plastic. Clear to light yellow fluid is in good condition. Medium to dark brown fluid is degraded and should be flushed. Black fluid is severely degraded. If the level is near or below MIN, top up with the correct DOT specification printed on the reservoir cap — and inspect for leaks if the level dropped quickly. How to check brake fluid correctly takes 60 seconds and covers both level and condition.
What color should brake fluid be?
Fresh brake fluid is clear to very light yellow and fully transparent. As brake fluid ages and absorbs moisture, it darkens progressively — light golden yellow after one to two years, medium brown after two to three years, dark brown to black after five or more years. Milky or cloudy fluid at any color indicates water contamination from a system breach. When you check brake fluid and find dark brown or black fluid, it has a significantly reduced boiling point and should be flushed regardless of the level reading.
Can I add brake fluid myself?
Yes. Confirm the correct DOT specification from the reservoir cap or owner’s manual. Clean the area around the cap before opening to prevent contamination. Add fluid slowly in small amounts — stop at the MAX line. Replace the cap immediately and firmly. Wipe any spilled fluid with water immediately — brake fluid strips automotive paint on contact. If the level was significantly low, investigate the cause before assuming a top-up is sufficient. Rapidly dropping fluid levels indicate a leak, not just normal pad wear.
How often should brake fluid be changed?
Most manufacturers recommend changing brake fluid every 2 years or 30,000 miles. Brake fluid absorbs moisture continuously — after 2 to 3 years, absorbed moisture typically reduces the fluid’s boiling point by 100°F or more below its fresh specification. When you check brake fluid and find dark coloring before this interval, flush it earlier. Drivers doing track days, mountain driving, or heavy towing should change brake fluid annually. A brake fluid flush costs $80 to $150 — far less than the safety implications of brake fade.
What happens if brake fluid is low?
Low brake fluid reduces hydraulic pressure available to the calipers and indicates either normal pad wear (as pads wear thin, calipers extend and draw fluid from the reservoir — a gradual normal process) or a system leak. A leak allows air into the hydraulic circuit which compresses under pressure and produces a spongy brake pedal. When you check brake fluid and find the level significantly low with a spongy pedal, professional inspection is needed before further driving.
Related Guides
How to check brake fluid is one component of complete brake system health. For understanding when brake pads need replacement — the most common reason fluid level drops over time — see our brake pad lifespan guide. If brake inspection revealed grinding sounds, our grinding noise when braking guide covers rotor damage assessment. For shuddering during braking, see our car shudders when braking guide. And for the complete vehicle maintenance schedule including brake fluid service intervals, see our complete car maintenance schedule.